
Natural hazards, especially earthquakes, are engaging topics for students. Capitalizing on students’ inherent interest, this instructional sequence begins with an opportunity for students to “create an earthquake”. Through this initial exploration students gain an understanding of a fault system’s physical properties, and energy inputs and outputs. Building from this understanding, a scaffolded collection of physical models and data visualizations enables students to explore what happens to energy released during an earthquake. Next, students design and construct their own technology to record seismic waves. While simplistic, students’ devices provide a useful perspective to understand the more complex technology used by scientists to record earthquakes. This sequence concludes by connecting earthquakes to society through building construction. Here students explore earthquake hazards and damage to buildings by constructing model buildings and subjecting the buildings to ground vibration (shaking similar to earthquake vibrations) on a small shake table.
Instruction in this sequence relies heavily on physical models, and sequences of models to help students conceptualize both the temporal and spatial abstractness of the geological phenomena related to earthquakes.

The goal of the ENGAGE phase is to generate students’ interest in earthquakes, access and make explicit students’ prior knowledge about the topic, and provide a pathway, in this case several related models, for students to probe deeper into the phenomena. The guiding question(s) for this phase are:
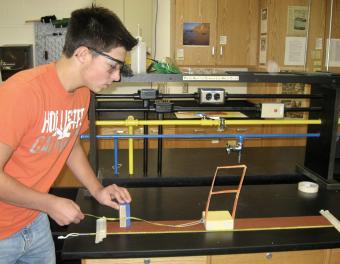
The first model, the Earthquake Machine, enables students to focus their attention on the physical system that underpins the actual phenomena rather than the shaking that results from an earthquake. Students use the model to test and revise their prior knowledge about and earthquake. While the Earthquake Machine is functionally similar to a fault system… slowly storing energy… the rubber band that stores the energy is very unlike the Earth materials (rocks) it is supposed to represent (a full discussion of how the model is both like and unlike reality is contained in the instructors guide). As a result students frequently question whether real rocks store energy.
Addressing their inquiry satisfactorily is critical for successful seismology instruction since the elastic nature of rocks is fundamental to explaining both why scientists believe earthquakes occur, and how we believe seismic waves propagate. Thus, we have chosen to pair the Earthquake Machine with a simple, inexpensive, physical demonstration that physically illustrates (see and feel) that solid rocks have an elastic property.
Using a block-and-sandpaper model, students collaborate in small groups to investigate how energy is stored elastically in rocks and released suddenly as an earthquake (the earthquake cycle). This activity emphasizes the role of mechanical models in understanding and testing ideas in science.
Go to Resource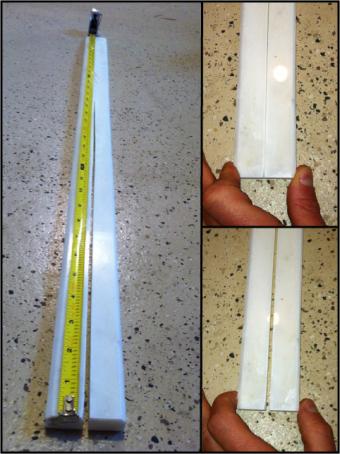
Through a demonstration lead by the teacher, the discrepant concept of rocks exhibiting elastic behavior is physically illustrated with an easily obtained, inexpensive model.
Go to ResourceThe goal of the ENGAGE phase is to generate students’ interest in earthquakes, access and make explicit students’ prior knowledge about the topic, and provide a pathway, in this case several related models, for students to probe deeper into the phenomena. The guiding question(s) for this phase are:
Now that students have experienced how solid rocks can deform in response to stress, the next two activities extend the concept. In the first activity below students investigate how a rock’s temperature affects the deformation a rock undergoes (brittle, elastic or ductile) in response to stress. Based in the demonstrations, students deduce two broad classes of rock deformation; these are faults and folds.
In the second activity, students probe deeper into how various faults and folds form. The investigation begins as students experiment with Silly Putty. Here students see that different stresses (compression, tension and shear) result in different strain in the Silly Putty. This lays the foundation for students to understand that the structure we see in rocks provides evidence for they type of stress that caused it. Students apply this idea by examining images of faults and folds to determine how the structures formed. Additional evidence is collected through experimentation with sponge models.

A candy bar, made almost entirely from nougat, is a useful model for connecting strain in rocks to faulting (earthquakes) and folding.
Go to Resource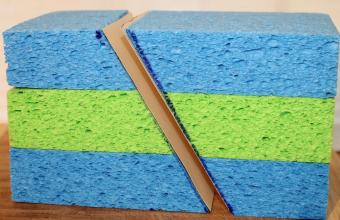
Fault types and rock deformation. The faults and folds in rocks provide evidence that the rocks are subjected to compressional, tensional, and/or shear stress. Silly Putty™ allows students to discover that the structure we see in rocks provides evidence for they type of stress that formed. Students apply this idea by examining images of faults and folds experimentation with sponge models.
Go to ResourceThe goal of the EXPLORE phase is to provide students with additional activities that enable them to generate additional ideas about earthquakes. The guiding question(s) for this phase are:
The proceeding earthquake activities emphasized the mechanics of the earthquake process; the storing and sudden release of energy was specifically emphasized. This suite of three activities describes how this energy is transmitted outwards from the earthquake source. The first activity activates students’ interest with a discrepant visual analogy and accesses students’ prior knowledge of elastic waves in everyday life (compression water waves). This example helps students conceptualize seismic waves as 3-D wave fronts that radiate outward in all directions, including through Earth’s interior. Next, the 5 Slinky Model is used to reinforce the concept that seismic waves travel outward in all directions and to illustrate that these waves have a travel times. The 5 Slinky Model is also used to transitions students conception of seismic waves from wave fronts, as illustrated in the first activity, to ray paths. The finally activity uses both demonstrations with a single Slinky as well as kinesthetic “human wave” demonstrations where students “are” the particles the waves travel through. These demonstrations emphasize that seismic waves transfer energy not material and illustrate the mechanism of seismic wave propagation (P, S and Surface waves).
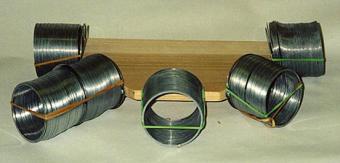
The slinky is an effective tool for the demonstration seismic wave characteristics and wave propagation. Slinkys can be used both individually and in various combinations to demonstration different concepts.
Go to Resource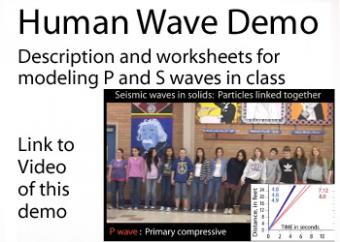
Remember the “stadium wave,” when one person stands and raises his hands in the air and the motion is translated completely around the arena? This simple kinesthetic demonstration uses a similar principal by sending seismic waves through a line of people to illustrate the difference between P waves and S waves propogating through various materials. Lined up shoulder-to-shoulder, students to "become" the material that P and S waves travel through so that once "performed," the principles of seismic waves will not be easily forgotten.
Go to ResourceThe goal of the EXPLORE phase is to provide students with additional activities that enable them to generate additional ideas about earthquakes. The guiding question(s) for this phase are:
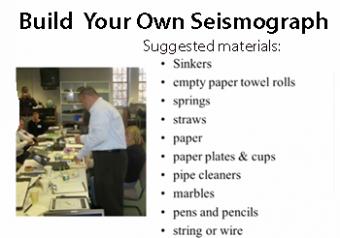
Working in small groups of 3-4, students design and construct a seismograph using common household and craft materials provided. Students will demonstrate to the class (by shaking their table) how their seismographs records ground motion and if possible, the time of the disturbance occured.
Go to ResourceThe goal of the EXPLORE phase is to provide students with additional activities that enable them to generate additional ideas about earthquakes. The guiding question(s) for this phase are:
We encourage the reuse and dissemination of the material on this site as long as attribution is retained. To this end the material on this site, unless otherwise noted, is offered under Creative Commons Attribution (CC BY 4.0) license
